![]()
For the presentation with Hendricus Kramer on NetScaler Automation with Puppet at E2EVC in Lisbon, I used a PowerShell script to import a NetScaler VPX on XenServer with a fixed IP-address. This ensured we no longer needed to run the first time setup wizard with the console, but now can easily import a NetScaler VPX with a given IP address and have it ready for use (or configuration through NITRO).
I do however realize that it is more common for customers to run a VMware vSphere Hypervisor environment than a Citrix XenServer one (not taking cloud deployments into consideration). So I figured that even though the post for XenServer was great, I’d probably make more people happy by also sharing a similar script for vSphere as well.
So let me share my PowerShell adventure that created an import script for ESX(i) as well!
CTX128250: How To Auto-Provision NetScaler VPX on ESX(i) with a fixed IP address
Luckily for me there is a great Citrix Knowledge Base article on How To Auto-Provision NetScaler VPX on ESX(i) that offers a step-by-step guide on how to import a NetScaler VPX onto ESX(i) and provide it with a pre-configured NetScaler IP-address, using the VMware Tools Utility to manually change the Configuration Parameters of a VM.
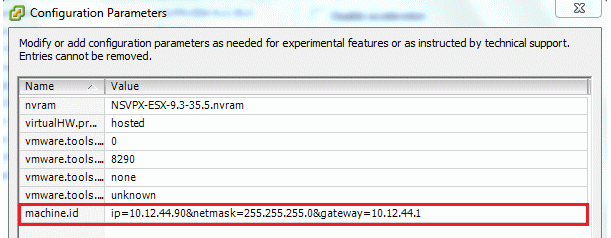
NetScaler VPX machine settings
Even though the instructions are very clear, I needed more than just manual instructions to implement this method into a DevOps automation solution. Therefore I decided to translate the instructions into my new favorite scripting language: PowerShell.
PowerCLI
To create a PowerShell script for the manual instructions in the above mentioned Citrix Knowledge Base article, I downloaded and installed VMware vSphere PowerCLI on my computer, which allows me to include these great PowerShell snap-ins to script directly against the ESX(i) host or vCenter server. So with the VMware.VimAutomation.Core PowerShell snap-in at hand I could translate the manual instructions from the Citrix Knowledge Base Article into some fun PowerShell cmdlets and build my script.
The VMware ESXi environment
As my homelab runs solely on Citrix XenServer I did not only need the PowerShell snap-ins provided by PowerCLI, but I needed a VMware test environment as well to ensure my script was working. Luckily for me PepperByte runs a VMware lab environment which I could use for my script development and testing.
Unfortunately when I ran my PowerShell script for the first time it threw back some error messages regarding license errors.

PowerShell License Error
It turned out the lab environment was still configured for a free ESXi license and this did not allow me to use the New-AdvancedSetting cmdlet from the PowerCLI snap-in.

vSphere 5 Hypervisor License
In order to use the cmdlets to alter the Configuration Parameters, you will need a licensed ESX host. And as my vShpere knowledge is somewhat limited a big shout-out is due for PepperByte’s CTO Daniel Nikolic who took it upon himself to help me out and upgraded the PepperByte lab environment to the latest vShpere version with a proper license. This allowed me to further test my script and ensure it was working as designed.
My PowerShell script
I know I’m not a PowerShell guru and the script can probably use some tweaking and functions, but here’s my PowerShell script to automatically import a NetScaler VPX in ESX(i) and give it a fixed NetScaler IP-address:
#based upon Citrix Knowledgebase article: http://support.citrix.com/article/ctx128250

# Constants
$VMDefaultName = "NSVPX-ESX"                               # Default name of NetScaler VPX
$FirstNICDefaultName = "Network adapter 1"                 # Default name of the first NIC

# vSphere variables
$vServer = "xxx.xxx.xxx.xxx"                               # IP address of the ESX host
$vAppSource = "C:\Install\NSVPX-ESX-11.0-63.16_nc.ovf"     # NetScaler OVF file to import
$ESXiHostName = "xxxxx"                                    # Name of the ESX(i) host

# VM variables
$VMName = "NSVPX-FixedIP"
$IPaddress = "10.1.1.231"
$SubnetMask = "255.255.255.0"
$DefaultGW = "10.1.1.1"
$VMNetworkName = "Internal Network"
# Optional VM variable (can be useful for NetScaler license management). The MAC address must be in the valid "manual" range 00:50:56:00:00:00 - 00:50:56:3F:FF:FF.
$MACaddress = "00:50:56:34:05:58"

#Load VMware PowerCLI Snapins
If ((Get-PSSnapin -Name VMware.VimAutomation.Core -ErrorAction SilentlyContinue) -eq $null)
{
    Add-PsSnapin VMware.VimAutomation.Core
    Write-Verbose -Message "Adding the VMware.VimAutomation.Core PowerShell snap-in ..." -Verbose
}

# Connect to the vSphere server
Connect-VIServer -Server $vServer -WarningAction SilentlyContinue

# Import OVF on specified ESXi Host
$vmHost = Get-VMHost -Name $ESXiHostName
Import-vApp -Source $vAppSource -VMHost $vmHost -Force -WarningAction SilentlyContinue

# Get VM (based upon default name after import)
$VM = Get-VM -Name $VMDefaultName -Server $ESXiHostName

# Change the Network Adapter network
$VMFirstNIC = Get-NetworkAdapter -VM $VM | Where-Object {$_.Name -eq $FirstNICDefaultName}

If (($MACaddress -eq $null) -or ($MACaddress -eq ""))
{
    # Change the first Network adapter's Network (MAC address is auto generated)
    Set-NetworkAdapter $VMFirstNIC -NetworkName $VMNetworkName -Confirm:$false
}
Else
{
    # Change the first Network adapter's Network name and provide a fixed MAC address
    Set-NetworkAdapter $VMFirstNIC -NetworkName $VMNetworkName -MacAddress $MACaddress -Confirm:$false
}
# Change the VM name
Set-VM -VM $VM -Name $VMName -Confirm:$false

# Configure fixed IP for NetScaler
New-AdvancedSetting $VM -Type VM -Name "machine.id" -Value "ip=$IPaddress&netmask=$SubnetMask&gateway=$DefaultGW" -Confirm:$false -Force:$true -WarningAction SilentlyContinue

# Start VM
Start-VM $VM

# Disconnect from the vShpere Server
Disconnect-VIServer -Server $vServer -Confirm:$false -WarningAction SilentlyContinue
I’ve added an additional setting to the script to configure the MAC address of the VM with a fixed address. This allows you to request your NetScaler License from Citrix and use NITRO to upload a valid license file to your NetScaler.
The following sources have been used to create this post:
How to Auto-Provision NetScaler VPX Appliance on a VMware ESX or ESXi Host
vSphere PowerCLI Documentation
Esther has been working in different roles and functions as an IT consultant ever since she finished her Masters degree in Computer Science in 1997. She has worked as a web developer, database administrator, and server administrator until she discovered how Server-Based Computing ( SBC ) combined servers, desktops, and user experience in one solution. Esther has been specializing in virtualization solutions such as SBC, VDI, application, and server virtualization for over eight years now and is currently working as a Senior Consultant at PepperByte, where she designs and implements Citrix® solutions for both small-business and large-enterprise infrastructures scaling from 100 to 15,000 users.
In january 2014 her first book Citrix XenApp 6.5 Expert Cookbook was published by Packt Publishing.
Esther is awarded as a Citrix Technology Professional (CTP) from 2015 - 2017.
Esther is awarded as a Microsoft Most Valuable Professional (MVP) in 2017.
Esther is a Citrix Certified Expert – Virtualization (CCE-V), Citrix Certified Professional – Mobility (CCP-M), Citrix Certified Professional – Networking (CCP-N) and RES Software Certified Professional (RCP).